The interior of gallstones may house parasites inaccessible to the zapping. Eliminate this source of reinfection by flushing them out with liver cleanses (page 552).
Although the center of the bowel contents is often unaffected by electric current, which lets bowel bacteria like Shigella, Escherichia coli (E. coli) and parasite stages survive, sometimes it is nearly all sterilized by zapping. This results in considerable shrinkage of the bowel movement. Eliminate remaining parasites
and bacteria with a single dose (2 tsp.) of Black Walnut Hull Tincture, Extra Strength (see page 543).
There is no way of distinguishing between “good” and “bad” bacteria with either of these methods. However even good bacteria are bad if they come through the intestinal wall, so zapping targets mostly “bad” bacteria. The good news is that perfect bowel habits often result in a few days. Evidently, the good bacteria are benefited by killing the invasive ones. Home made yogurt and buttermilk (see Recipes) are especially good at
recolonizing the bowel. But it does not seem wise to culture yourself with special commercial preparations and risk getting parasite stages again when you can become normal so soon anyway. If you do decide to take some acidophilus bacteria to replenish your intestinal flora make sure you test for parasites like Eurytrema first.
When a large number of parasites, bacteria and viruses are killed, it can leave you fatigued. Try to give yourself a low-stress day after your initial zapping. But there are no significant side effects. I believe this is due to the second and third zapping which mops up bacteria and viruses that would otherwise be able to go on a feeding frenzy with so much dead prey available.
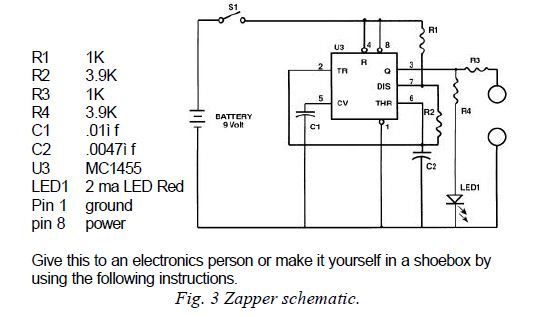
To build your zapper you may take this list of components to any electronics store (Radio Shack part numbers are given for convenience).
Zapper Parts List
|
Item |
Radio Shack Catalog Number |
| large shoe box | |
| 9 volt battery | |
| 9 volt battery clips | 270-325 (set of 5, you need 1) |
| On-Off toggle switch | 275-624A micro mini toggle switch |
| 1 KW resistor | 271-1321 (set of 5, you need 2) |
| 3.9 KW resistor | 271-1123 (set of 2, you need 2) |
| low-current red LED | 276-044 or 276-041 or 276-045 |
| .0047 uF capacitor | 272-130 (set of 2, you need 1) |
| .01 uF capacitor | 272-1065 (set of 2, you need 1) |
| 555 CMOS timer chip | 276-1723 (set of 2, you need 1) |
| 8 pin wire-wrapping socket for the chip |
276-1988 (set of 2, you need 1) Note: Radio Shack is discontinuing all wire wrap sockets. Find another parts store or use 276-1995 (but the legs are much shorter and harder to attach clips to). |
| short (12”) alligator clip leads | any electronics shop, get 6 |
| Microclip test jumpers | 278-017 (you need 2 packages of 2) |
| 2 bolts, about 1/8” diameter, 2” long, with 4 nuts and 4 washers |
hardware store |
| 2 copper pipes, ¾” diameter, 4” long |
hardware store |
| sharp knife, pin, long-nose pliers |
Hints for absolute novices: Don’t let unusual vocabulary deter you. A “lead” is just a piece of wire used to make connections. When you remove a component from its package, label it with a piece of tape. A serrated kitchen knife works best as does a large safety pin. Practice using the microclips. If the metal ends
are L-shaped bend them into a U with the long-nose pliers so they grab better. Chips and chip holders are very fragile. It is wise to purchase an extra of each in case you break the connections.